Wednesday, May 18, 2022

Lemon & Herb Balsamic Vinaigrette

Lemony zip really brings greens to life, but this dressing doesn’t stop there. Drizzle it on asparagus for grilling, on quinoa mixed with white beans and tomatoes, on basically anything that you want to. It’s a little bit of sunshine in a jar.

You’ll want to use the best olive oil you can find for this, as the oil sets the whole tone for the dressing. I really like the nutty smooth flavor of olive oil over other oils. The balsamic vinegar adds a nice sweet note without competing with the zip of garlic and lemon. Use whatever herbs are fresh and seem like a good idea that day. Chives are pictured here, but that’s because they were freshly harvested. You could get equally delicious (and yet quite different) results from basil, oregano, or thyme. This is a really nice use for tarragon, if you have some handy. Hint: Make twice what you think you’ll need, because it really does go quickly.

Ingredients
  • 2 Cloves garlic, peeled and minced
  • Juice of 1 lemon, plus pulp
  • 1/4 cup or so chopped fresh herbs
  • 1/2 teaspoon salt
  • 1 teaspoon-1 Tablespoon cracked black pepper, depending on preference
  • Balsamic vinegar (about 1/4 cup)
  • Olive oil (about a cup)
Directions
  1. Dice the garlic and herbs and place in a glass container. 
  2. Cover with lemon juice and pulp and stir to combine.
  3. Add salt and pepper.
  4. Pour in balsamic vinegar to taste and stir to blend.
  5. Slowly whisk in olive oil to combine.
  6. Let chill.

Monday, May 16, 2022

Storing Vegetables without Plastic


Ahhh, spring! 

That time of year when the garden starts sending out leaves and shoots of every variety! There's a reason that good times are called "salad days." 

For those of us with gardens or CSA subscriptions, storing the weekly harvest can be the most difficult part of the season. Here's a handy reference guide to keeping your lovely produce without plastic (and often without refrigeration):

Always remove any tight bands from your vegetables or at least loosen them to allow them to breathe. 

Artichokes- place in an airtight container sealed, with light moisture. 
Asparagus- place them loosely in a glass or bowl upright with water at room temperature. (Will keep for a week outside the fridge) 
Avocados- place in a paper bag at room temperature. To speed up their ripening- place an apple in the bag with them. 
Arugula- arugula, like lettuce, should not stay wet! Dunk in cold water and spin or lay flat to dry. Place dry arugula in an open container, wrapped with a dry towel to absorb any extra moisture.
Basil- is difficult to store well. Basil does not like the cold, or to be wet for that matter. The best method here is an airtight container/jar loosely packed with a small damp piece of paper inside-left out on a cool counter. 
Beans, shelling- open container in the fridge, eat ASAP. Some recommend freezing them if not going to eat right away.
Beets- cut the tops off to keep beets firm, (be sure to keep the greens!) by leaving any top on root vegetables draws moisture from the root, making them lose flavor and firmness. Beets should be washed and kept in and open container with a wet towel on top.
Beet greens- place in an airtight container with a little moisture. 
Broccoli- place in an open container in the fridge or wrap in a damp towel before placing in the fridge. 
Broccoli Rabe- left in an open container in the crisper, but best used as soon as possible.
Brussels Sprouts- If bought on the stalk leave them on that stalk. Put the stalk in the fridge or leave it on a cold place. If they’re bought loose store them in an open container with a damp towel on top. 
Cabbage- left out on a cool counter is fine up to a week, in the crisper otherwise. Peel off outer leaves if they start to wilt. Cabbage might begin to loose its moisture after a week , so, best used as soon as possible. 
Carrots- cut the tops off to keep them fresh longer. Place them in closed container with plenty of moisture, either wrapped in a damp towel or dunk them in cold water every couple of days if they’re stored that long. 
Cauliflower- will last a while in a closed container in the fridge, but they say cauliflower has the best flavor the day it’s bought. 
Celery- does best when simply places in a cup or bowl of shallow water on the counter.

Celery root/Celeriac- wrap the root in a damp towel and place in the crisper.

Corn- leave unhusked in an open container if you must, but corn really is best the day it’s picked.
Cucumber- wrapped in a moist towel in the fridge. If you’re planning on eating them within a day or two after buying them they should be fine left out in a cool room.

Eggplant- does fine left out in a cool room. Don’t wash it, eggplant doesn’t like any extra moisture around its leaves. For longer storage- place loose, in the crisper.

Fava beans- place in an air tight container.

Fennel- if used within a couple days after it’s bought fennel can be left out on the counter, upright in a cup or bowl of water (like celery). If wanting to keep longer than a few days place in the fridge in a closed container with a little water.
Garlic- store in a cool, dark, place.
Green garlic-an airtight container in the fridge or left out for a day or two is fine, best before dried out. 
Greens- remove any bands, twist ties, etc. most greens must be kept in an air-tight container with a damp cloth- to keep them from drying out. Kale, collards, and chard even do well in a cup of water on the counter or fridge. 
Green beans- they like humidity, but not wetness. A damp cloth draped over an open or loosely closed container. 
Green Tomatoes- store in a cool room away from the sun to keep them green and use quickly or they will begin to color.

Herbs- a closed container in the fridge to kept up to a week. Any longer might encourage mold.

Lettuce- keep damp in an airtight container in the fridge. 
Leeks-leave in an open container in the crisper wrapped in a damp cloth or in a shallow cup of water on the counter (just so the very bottom of the stem has water).

Okra- doesn’t like humidity. So a dry towel in an airtight container. Doesn’t store that well, best eaten quickly after purchase 
Onion- store in a cool, dark and dry, place- good air circulation is best, so don’t stack them.

Parsnips-an open container in the crisper, or, like a carrot, wrapped in a damp cloth in the fridge.
Potatoes- (like garlic and onions) store in cool, dark and dry place, such as, a box in a dark corner of the pantry; a paper bag also works well.
Radicchio- place in the fridge in an open container with a damp cloth on top.

Radishes- remove the greens (store separately) so they don’t draw out excess moisture from the roots and place them in a open container in the fridge with a wet towel placed on top.
Rhubarb-wrap in a damp towel and place in an open container in the refrigerator.
Rutabagas- in an ideal situation a cool, dark, humid root cellar or a closed container in the crisper to keep their moisture in. 
Snap peas- refrigerate in an open container
Spinach- store loose in an open container in the crisper, cool as soon as possible. Spinach loves to stay cold. 
Spring onions- Remove any band or tie and place in the crisper.
Summer Squash- does fine for a few days if left out on a cool counter, even after cut.
Sweet peppers- Only wash them right before you plan on eating them as wetness decreases storage time. Store in a cool room to use in a couple a days, place in the crisper if longer storage needed.
Sweet Potatoes- Store in a cool, dark, well-ventilated place. Never refrigerate--sweet potatoes don’t like the cold.
Tomatoes- Never refrigerate. Depending on ripeness, tomatoes can stay for up to two weeks on the counter. To hasten ripeness place in a paper bag with an apple.
Turnips- remove the greens (store separately) same as radishes and beets, store them in an open container with a moist cloth.

Winter squash-store in a cool, dark, well ventilated place. Many growers say winter squashes get sweeter if they’re stored for a week or so before eaten.
Zucchini- does fine for a few days if left out on a
cool counter, even after cut. Wrap in a cloth and
refrigerate for longer storage. 

How to Store Fruit Without Plastic 
Apples- store on a cool counter or shelf for up to two weeks. For longer storage in a cardboard box in the fridge.
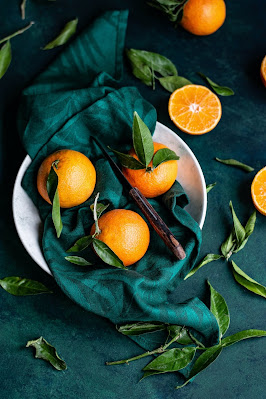
Citrus- store in a cool place, with good airflow, never in an air-tight container. 
Cherries-store in an airtight container. Don’t wash cherries until ready to eat, any added moisture encourages mold.
Berries-Don’t forget, they’re fragile. When storing be careful not to stack too many high, a single layer if possible. A paper bag works well, only wash before you plan on eating them.

Melons- uncut in a cool dry place, out of the sun up to a couple weeks. Cut melons should be in the fridge, an open container is fine.

Peaches(and most stone fruit)- refrigerate only when fully ripe. More firm fruit will ripen on the counter. 
Pears- will keep for a few weeks on a cool counter, but fine in a paper bag. To hasten the ripening put an apple in with them.
Strawberries- Don’t like to be wet. Do best in a paper bag in the fridge for up to a week. Check the bag for moisture every other day.  

Tuesday, April 26, 2022

Cream cheese from scratch


Having made bagels from scratch, I decided to look into cream cheese from scratch. I found a write-up from the prairie homestead, which boldly proclaimed:

LEARNING HOW TO MAKE CREAM CHEESE IS ONE OF THOSE THINGS THAT MAKES YOU FEEL LIKE A HOMESTEADING ROCKSTAR…

And you know I had to try it after that. Bonus, I discovered the whole of prairie homestead, which is a delight. I'm pleased to report that I do, indeed, feel like a homesteading rockstar, especially when using local cream from the milkshare herd.

Ingredients
1 quart cream (or half-and-half). Use the highest quality cream you can find. Fresh from a Jersey cow is best, but any will do.
1/8 teaspoon Mesophilic starter culture
Fine cheesecloth (improvised substitutes)
Sea salt (optional)

Directions
Make sure you are using a glass container to hold your cream. Gently stir in the starter culture.

Loosely cover (not airtight!) and set it on your counter top to culture for 8 to 12 hours. (It may take more or less time, depending on the temperature of your kitchen.)

You’ll know it’s done when it has set up and somewhat resembles yogurt. (It might not be a perfectly even consistency, but that’s ok.)

Dump the thickened cream into the cheesecloth and allow the whey to drip out for at least 12 hours (the longer it drips, the firmer your finished cheese will be).

(Instead of draining the cream at this stage, you could also turn it into cultured butter. Decisions… decisions…)

Once it has reached the desired consistency, scrape it out of the cheesecloth and lightly salt it to taste. The salt is optional, but it will help it keep slightly longer. Store in an airtight container in your fridge– it will get firmer as it chills.

Because it's fresh, it's easy to spread.
Feel free to blend with fresh fruit or cinnamon or other spices if that's your thing.

Monday, April 25, 2022

Quinoa Tabouli


I love tabouli, especially when I use quinoa instead of bulgur as the base. It's refreshing and light, perfect for taking to a potluck, and an all-around amazing side dish whenever the ingredients are available, which is most of the year where I live. Cucumbers, parsley, and grape tomatoes are a staple all summer into early fall. We don't have lemon trees here in the mountains, but everything else is grown in the yard or at a farm nearby. 

If you haven't tried growing quinoa for yourself yet, I highly recommend it! This superfood is super easy to grow, takes very little land, is simple to harvest, and stores like a dream. And it cooks as quickly as pasta! You can even get more than one crop in a season most places if you plan accordingly. The quinoa cooks in the amount of time it takes to prep everything else (less than 30 minutes), and it's gluten free. You can use any quinoa variety, but the darker the color the stronger the flavor. I tend to use red or black quinoa during spring and fall, and use white when it's blisteringly hot out. But they're all just great.

Note: This recipe, which is really more of an assembly, scales beautifully. Need to feed an army? Just multiply! Need to make a smaller batch? Divide in half and enjoy.

INGREDIENTS
1 cup dried quinoa, any color
1-2 cucumbers, diced 
1 pint grape tomatoes or cherry tomatoes, diced
1 teaspoon fine sea salt, divided
1-2 medium bunches parsley
1 bunch mint (I use a hearty amount, but technically the mint is completely optional. Use as much as makes sense to you for you taste.)
3-4 scallions, or red onion if you're out of scallions, thinly sliced
⅓ cup extra-virgin olive oil
1 lemon, juiced and strained for seeds
1-2 medium cloves garlic, pressed or minced 

INSTRUCTIONS
  1. Fill a saucepan with 1.75 cups cool water. Stir in the quinoa and heat to boiling, then reduce to a simmer and cover, simmering for 15 minutes. Remove from heat and remove cover, letting it stand for another ten minutes or so. Fluff with a fork.
  2. While the quinoa is cooking, dice the cucumber and tomatoes. Combine the diced cucumber and tomato in a medium bowl with ½ teaspoon of the salt. Stir, and let the mixture rest for at least 10 minutes, or until you’re ready to mix the salad.
  3. To prepare the parsley, cut off the thick stems. Then, finely chop the parsley and remaining stems, transferring the chopped parsley to a large serving bowl before proceeding with the next.
  4. Add the chopped mint and onion to the bowl with the parsley.
  5. Strain off and discard the cucumber and tomato juice that has accumulated in the bottom of the bowl (this ensures that your tabouli isn’t too watery), and add the strained cucumber and tomato to the bowl.
  6. In a small measuring cup or bowl, whisk together the olive oil, lemon juice, garlic, and remaining ½ teaspoon salt. Pour it into the salad and stir to combine. Taste, and adjust if necessary—add more lemon juice for zing, or more salt for more overall flavor.
  7. Gently fold the vegetables and herbs together, then fold in the quinoa until combined.
  8. You can serve it immediately but it really benefits from an hour or more for the flavors to blend. I like to chill it in the fridge, covered, for at least an hour.
  9. Tabouli will keep well in the refrigerator, covered, for up to 4 days, or so I hear. Mine is always gone before I can blink.
  10. Perfect for taking to a pot luck!

Sunday, April 24, 2022

Chicken and Dumplings


There’s nothing quite as satisfying as a dish of Chicken and dumplings. The dumplings can be used with leftover roasted chicken and vegetables to make a second delightful, hearty, satisfying dinner. This is also perfect for stretching a small amount of meat and vegetables without resorting to a more traditional stew or the ubiquitous soup. If you raise your own hens, simmering is the perfect way to serve the meat, leaving it tender and letting all the flavor have a chance to develop. If you want to get the truest flavor from the simmer, let it cool to rom temperature after cooking.

Time saving option that doesn’t sacrifice flavor: Put the vegetables and chicken in a crock pot on low for 6-8 hours (high for 4-6).  Debone the chicken and set everything from the crock pot in the stock pot that you will use to finish the recipe on the stovetop. Place stockpot in the refrigerator if making this step the day before. I like to measure and mix the dry ingredients for the dumplings ahead of time and then all that left is to whip up the dumplings while the chicken comes up to temperature.


INGREDIENTS
Chicken & Stock:
1 whole chicken
4 cups chicken broth
2 cups water
2 teaspoons salt
1 teaspoon pepper
1 teaspoon garlic powder
1 bay leaf (optional)
1/3 cup butter
1 cup finely diced celery
1 cup finely diced carrots
1 medium onion, diced
1/3 cup flour
Dumplings:
1 1/8 cups milk
6 tablespoons butter, melted
3 cups all-purpose flour
2 tablespoons baking powder
1 teaspoon salt
1/4 teaspoon pepper
1/4 teaspoon dried thyme

INSTRUCTIONS
Cook Chicken & Prepare Stock:
  1. Add chicken, broth, water, salt, pepper, garlic powder and bay leaf to a wide stock pot or dutch oven. Cover then bring to a slow simmer over medium heat. Once broth is bubbling, reduce heat to low then cook, covered, for 2-3 hours, or until legs and thighs are pulling apart from the body and the chicken is very tender. See notes.
  2. Remove chicken from broth; set aside. Strain broth into a large bowl or pitcher, discarding bay leaf and loose bones or skin; set broth aside.
  3. Melt butter in the (now empty) pot then cook celery, carrots and onion over medium heat for 10 minutes. Add flour, stir well, then continue cooking for 5 minutes.
  4. Slowly stir reserved broth in with vegetables. Continue stirring until completely smooth. Reduce heat to low and cover.
  5. Remove skin and bones from chicken then shred or cut chicken into bite-sized pieces.
  6. Prepare dumplings.
  7. Heat pot with broth over medium-high heat until it starts to boil. Add chicken. Gently drop dumplings, one at a time, into gently boiling broth. Take care to drop dumplings away from other freshly dropped dumplings as they will stick to each other before they have a chance to cook.
  8. Once all of the dumplings are in the pot, sprinkle with additional pepper then cover pot. Reduce heat to medium-low then allow to cook for 10 minutes or until dumplings are cooked through.
  9. Serve immediately.
  10. Prepare the Dumplings:
  11. Place milk (1/8 cup is 2 tablespoons) in a wide, shallow bowl in the freezer for about 10 minutes to chill. 
  12. Melt the butter then set aside.
  13. Combine flour, baking powder, salt, pepper and thyme in a mixing bowl then whisk to combine; set aside.
  14. Slowly drizzle melted butter into chilled milk, stirring with a fork until combined. The mixture should look like curdled milk or cottage cheese.
  15. Add milk mixture to flour mixture then stir with a spoon or rubber spatula until just combined.
  16. If making Drop Dumplings: scoop portions of dough with two teaspoons or use a cookie scoop (I used a 1” cookie scoop in the ones pictured here) then drop into gently boiling broth.
  17. If making Rolled Dumplings: Turn dough out onto lightly floured surface then sprinkle with more flour. Roll into desired thickness (anticipate they will double in thickness when cooked). Cut into squares or rectangles (however your nana did it) then drop into gently boiling broth.

NOTES:

  • You can absolutely cook the chicken faster than the directions but the secret to tender, flavorful chicken and delicious stock is to slowly bring everything to temperature and to never allow it to reach a full, rolling boil. 
  • Bone-in, skin-on chicken breasts or thighs can be substituted but I don’t recommend boneless, skinless chicken. If you simply must use them anyway, omit the water and broth then use chicken stock instead and add a stick of butter. Or consider adding 6 chicken legs or wings to flavor the stock.
  • Drizzling melted butter into ice-cold milk will separate the butter into little fat globs. This accomplishes the same thing as cutting the butter into the flour as if making biscuit dough. We want the dumplings to be as tender and delicious as homemade biscuits. 
  • The dumplings will continue to soak up the broth the longer they sit. If you plan on making this ahead of when you will be serving it, consider preparing with 8 cups of chicken broth (rather than 4 cups broth and 2 cups water).
  • If you don’t love the idea of the finely chopped vegetables, feel free to just rough-chop a few carrots, stalks of celery and an onion then throw them in the pot when the chicken cooks. If you decide to do it this way, still cook the butter and flour for 5 minutes over medium heat. This just makes a little roux to thicken the stock a bit. You’ll see a lot of recipes that call for a can of Cream of Something soup – this is the homemade equivalent to that.
  • For an especially Southern spin on Chicken & Dumplings, add several sliced boiled eggs after adding the dumplings.

Storing Vegetables without Plastic