Wednesday, October 23, 2024

Profile: Butternut Sqash


Butternut squash is everywhere in Autumn. Farmers Markets have it in a million different sizes, and market baskets are overflowing. It's a great keeper, and a perfect addition to your autumn table, packed with nutrition and easily digested. It makes a beautiful soup, if that's your thing, or can be eaten right out of the shell after roasting. Mashed, it's practically perfect as one of the first table foods to serve to babies and toddlers. 

My favorite way to cook it is in the slow cooker -- set it whole in the slow cooker on low for 8 hours, remove and cut in half and scoop out the seeds. Dress with a little butter and a dash of salt. As the weather turns chilly, you can set this up in the morning and it's ready to be a star with dinner when you walk in the door. Athletes and after-school club kids have been known to eat a whole one while waiting for the meal to be served, and you can't really go wrong with this as a snack, since it packs so many minerals and nutrients. 

If you want to cube the squash before roasting, it makes a lovely addition to a kale-based salad. Add some pomegranate arils for an extra boost to nutrition and autumnal goodness. This recipe calls for pecans, which are also just everywhere in the Southeast in autumn, but you could use any nut, really: walnut or pine nut or almond. Skip the nuts if they aren't your thing, or switch to a seed if you have a nut allergy. Pumpkin seeds carry the autumn theme, or sunflower seeds are always a nice choice; both roast well with the Kale salad with squash and pecans recipe below.


Ingredients
1/2 small butternut squash, peeled and chopped into 1/2 inch square pieces (about 1 1/2 cups)
1 tablespoon olive oil or pecan oil
1/4 teaspoon sea salt
2 heads kale
3 pieces thick-cut bacon, optional
1 tablespoon lemon juice
1/3 cup pomegranate arils
Orange Vinaigrette:
3 tablespoons olive oil or pecan oil
2 tablespoons orange juice
1 teaspoon orange zest
1 tablespoon cider vinegar
Maple Toasted Pecans:
1/3 cup raw pecans
2 tsp olive oil or pecan oil
2 tsp pure maple syrup
1/8 tsp ground cinnamon
Pinch sea salt

Instructions
Preheat the oven to 400 degrees F. In a bowl, combine chopped butternut squash, olive oil and sea salt. Stir until combined. Spread mixture on a large baking sheet and roast for 20 minutes, stir, then roast another 5 to 10 minutes, until golden-brown and cooked through. Remove from the oven and set aside to cool.
While the squash is roasting, add the bacon to a small skillet over medium high heat and cook until it reaches desired level of crisp (about 2 to 3 minutes per side). Place on a cutting board and allow to cool, then chop into pieces.
Add all of the ingredients for the orange vinaigrette to a small blender. Blend until completely combined (note: you can also whisk the ingredients together in a bowl if you don’t have a small blender).
In a small skillet, add all the ingredients for the maple-toasted pecans. Cook over medium-high heat for 3 to 5 minutes, or until toasted and sticky, stirring often. Be sure to monitor the nuts closely, as they burn easily.
Wash, dry, and chop the kale leaves and place them in a large serving bowl. Drizzle with lemon juice and use your hands to massage the juice into the kale leaves for 1 to 2 minutes, until you can feel the kale leaves are more tender.
Add the pomegranate arils, roasted butternut squash, chopped bacon, and maple-toasted pecans. Drizzle in desired amount of orange vinaigrette and toss everything together to combine. Serve alongside your favorite entrée.

Nutritional Information
One cup (205 grams) of cooked butternut squash provides a good source of calcium, iron, phosphorus, and copper as well as:

Calories: 82
Carbs: 22 grams
Protein: 2 grams
Fiber: 7 grams
Vitamin A: 457% of the Reference Daily Intake (RDI)
Vitamin C: 52% of the RDI
Vitamin E: 13% of the RDI
Thiamine (B1): 10% of the RDI
Niacin (B3): 10% of the RDI
Pyridoxine (B6): 13% of the RDI
Folate (B9): 10% of the RDI
Magnesium: 15% of the RDI
Potassium: 17% of the RDI
Manganese: 18% of the RDI

Saturday, September 21, 2024

Kale Salad with Butternut Squash and Pecans


Ingredients
1/2 small butternut squash, peeled and chopped into 1/2 inch square pieces (about 1 1/2 cups)
1 tablespoon olive oil or pecan oil
1/4 teaspoon sea salt
2 heads kale
3 pieces thick-cut bacon, optional
1 tablespoon lemon juice
1/3 cup pomegranate arils
Orange Vinaigrette:
3 tablespoons olive oil or pecan oil
2 tablespoons orange juice
1 teaspoon orange zest
1 tablespoon cider vinegar
Maple Toasted Pecans:
1/3 cup raw pecans
2 tsp olive oil or pecan oil
2 tsp pure maple syrup
1/8 tsp ground cinnamon
Pinch sea salt

Instructions
Preheat the oven to 400 degrees F. In a bowl, combine chopped butternut squash, olive oil and sea salt. Stir until combined. Spread mixture on a large baking sheet and roast for 20 minutes, stir, then roast another 5 to 10 minutes, until golden-brown and cooked through. Remove from the oven and set aside to cool.
While the squash is roasting, add the bacon to a small skillet over medium high heat and cook until it reaches desired level of crisp (about 2 to 3 minutes per side). Place on a cutting board and allow to cool, then chop into pieces.
Add all of the ingredients for the orange vinaigrette to a small blender. Blend until completely combined (note: you can also whisk the ingredients together in a bowl if you don’t have a small blender).
In a small skillet, add all the ingredients for the maple-toasted pecans. Cook over medium-high heat for 3 to 5 minutes, or until toasted and sticky, stirring often. Be sure to monitor the nuts closely, as they burn easily.
Wash, dry, and chop the kale leaves and place them in a large serving bowl. Drizzle with lemon juice and use your hands to massage the juice into the kale leaves for 1 to 2 minutes, until you can feel the kale leaves are more tender.
Add the pomegranate arils, roasted butternut squash, chopped bacon, and maple-toasted pecans. Drizzle in desired amount of orange vinaigrette and toss everything together to combine. Serve alongside your favorite entrée.

Nutritional Information
One cup (205 grams) of cooked butternut squash provides a good source of calcium, iron, phosphorus, and copper as well as:

Calories: 82
Carbs: 22 grams
Protein: 2 grams
Fiber: 7 grams
Vitamin A: 457% of the Reference Daily Intake (RDI)
Vitamin C: 52% of the RDI
Vitamin E: 13% of the RDI
Thiamine (B1): 10% of the RDI
Niacin (B3): 10% of the RDI
Pyridoxine (B6): 13% of the RDI
Folate (B9): 10% of the RDI
Magnesium: 15% of the RDI
Potassium: 17% of the RDI
Manganese: 18% of the RDI

Sunday, September 1, 2024

Oats

Oats

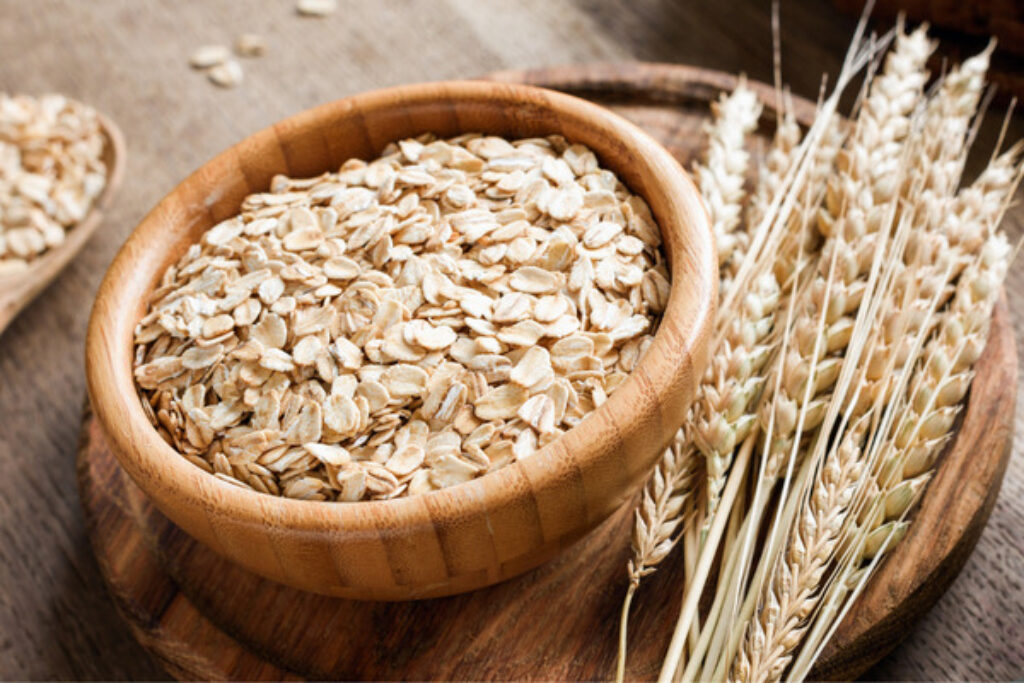
Oats, a versatile and nutritious grain, have a rich history and offer numerous health benefits. Oats make fantastic meals and desserts, and they are gluten free, extending the grasses-and-grains goodness. They are easy to grow in a wide variety of soils, and take us back to humankind's first storage in silos, a practice that is widely credited with making civilization possible.

History

Oats have been cultivated for centuries, with evidence of their use dating back to ancient civilizations. Initially considered a weed, oats eventually gained recognition as a valuable food source. They were particularly important in regions with cooler climates, as oats are more tolerant of cold temperatures than other grains.

Health Benefits

Oats are renowned for their exceptional nutritional profile. They are a good source of complex carbohydrates, providing sustained energy. Oats are also rich in dietary fiber, particularly beta-glucan, which has been linked to various health benefits, including:

  • Nutritious: Oats are a good source of protein, fiber, and vitamins B1 and B5. Low in calories, it would take about 40 minutes to burn off the 150 calories from a half-cup dried oats prepared in water.

  • Gluten-free: Oats are a gluten-free grain, making them a popular alternative for those with celiac disease or gluten sensitivity. If you’re allergic to gluten, be sure to purchase certified gluten-free oats to avoid gluten contamination from other grains.

  • Lowering cholesterol levels: Oats don’t have any cholesterol, and they help remove cholesterol that is there. Beta-glucan forms a gel-like substance in the digestive system, which can bind to cholesterol and reduce its absorption.

  • Regulating blood sugar: The soluble fiber in oats helps slow down the digestion of carbohydrates, leading to a more gradual release of glucose into the bloodstream.

  • Promoting digestive health: The fiber content of oats supports regular bowel movements and can help prevent constipation.

  • Supporting heart health: Oats' cholesterol-lowering and blood sugar-regulating effects contribute to overall cardiovascular well-being.

Frugal

One pound of rolled oats is 5 (US) cups, or ten batches of ½ cup dry

I usually buy my oats whole in bulk (hulled, but not yet rolled) and then roll them just before using. They cost about $1.40/pound. I usually calculate oats at $1.50 a pound for easier math, making each half-cup batch cost fifteen cents. Crazy-cheap for a bowl that will sustain you all day and help repair the damage you did the day before.

Note: Amazon has an 8 pound package of classic Quaker Oats for $8.15, and this seems like an insanely good deal. 


Preparation

Oats are incredibly versatile and can be prepared in various ways. My favorite way is to take freshly rolled old-fashioned oats and stir in a little cinnamon (and brown sugar, if you like). Heat milk (2:1 milk:oats, or you can use water) in a pan with a little vanilla. Just as the milk begins to boil, stir in the oats and spices. Simmer for 10-20 minutes, stirring to prevent sticking, until oats are the desired consistency. 

  • Oatmeal: The most common way to enjoy oats is by making oatmeal. Simply cook oats with water or milk until they reach a desired consistency.

  • Overnight oats: For a convenient and no-cook option, soak oats in liquid overnight. They will absorb the liquid and become soft and creamy. A traveler’s delight: a half-cup cup of oats can be put in a wide-mouth container with one cup of fresh water (a splash of lemon juice is also very nice with this) and be ready to eat 12 hours later. Longer soaking isn’t a problem. ½ dry oats+1 c. liquid=2 cups oatmeal.

  • Baking: Oats can be used in a variety of baked goods, such as cookies, muffins, and bread.

  • Granola: Oats are a key ingredient in granola, a popular breakfast and snack food.

  • Oat flour: Oats can be ground into flour and used as a gluten-free alternative in baking.

No matter how you choose to prepare them, oats are a delicious and nutritious addition to your table.


Nutritional Information

One cup of cooked old fashioned oats:

Calories 150

Calories from Fat 27

Total Fat 3g

Saturated Fat 0.5g

Trans Fat 0g

Polyunsaturated Fat 1g

Monounsaturated Fat 1g

Cholesterol 0mg

Sodium 0mg

Potassium 150mg

Total Carbohydrates 27g

Dietary Fiber 4g

Sugars 1g

Protein 5g


Wednesday, August 21, 2024

Election Day: Senate Bean Soup

The first time I had—or even heard of—Senate Bean soup was at McGuire’s Pub in Pensacola, Florida in 1991. Senate Bean Soup was on the menu for an astonishingly low price, the same price that the Senate cafeteria charged the Senators. They had the story and the recipe, and of course I ordered it. It was so good, it became an instant-classic, go-to comfort food. 

Yes, it simmers for three hours, but you won’t be disappointed. Serve it on Election Day, setting it up after you get home from voting in the morning, or set it up in a crock pot if you’ll be out canvassing all day; 6 hours on high or 8-12 hours on low. It’s a perfect foil to early-November chill, and it makes for excellent fare to serve during a results watch party.

This recipe serves four heartily, but you could easily scale it up to feed the election-day volunteers on the block, or an entire army of suffragettes. Top with shredded sharp cheddar, if you’d like, and garnish with slices of green onion tops or sprigs of fresh thyme. My favorite way to serve it is just as written, with freshly cracked black pepper on top.

Ingredients
1 pound dry navy beans
3/4 pound smoked ham hock
2 quarts chicken broth, vegetable broth, or cold water (the original recipe is simply water)
Note: Some chefs add1/2 teaspoon baking soda to help the beans soften. I find it’s not needed, and it’s not in the original, but it won’t hurt anything if you do this.
1 onion, diced
1 tablespoon butter (minimum; I measure butter with my heart)
fresh black pepper, to taste

Instructions
Rinse the navy beans and pick over. 
Dice the onion and set in the soup pot with the butter. Heat on medium or medium-high until translucent, stirring occasionally to prevent sticking.
Pour the beans into pot over the onions. Bury the ham hock in the center of the beans. Pour two quarts broth or cold water and the baking soda, if using.
Bring just to a boil, then lower to a simmer, cover and cook for approximately three hours stirring occasionally, until the beans have fully softened.
Remove the ham hock and set it aside on a dish to cool. 
Pull meat from the ham hock into bite-sized pieces and return the meat to soup. Stir. Discard the picked-over ham bone.
Before serving, bring the soup to a boil and season. Taste before adding salt, as I often find that the ham imparts enough flavor that I don’t really want any seasoning except fresh black pepper on top of each bowl. Serve on its own or with a nice green salad to complement the richness of the soup.

Notes
This Senate Bean Soup recipe is based on the original served in the US Senate cafeteria.

These days, the Senate Dining Room still has Senate Bean Soup on the menu, but the prices have gone up: $3.45, $4.00, or $4.50 for one cup, a cup-and-a-half, or two cups, respectively. This recipe makes 8-12 cups of soup, and the most expensive part is the ham hock. The whole batch costs about $6.00 to make. [Math: $1.50 for beans; $3.50 for ham hock; $0.50 butter; $0.50 onion] You can spend more, and I usually do, getting the meatiest hock I can find, and using broth instead of water. Even at double the cost, it’s still a beacon of frugality. 
My tally from the most recent batch: $12 total, for 12 cups $6.50 ham hock; $1.50 navy beans; $4 organic chicken broth. 
This soup will keep in the fridge for up to three days, and freezes well. 
If you have access to a microwave at your office, a frozen serving in a leak-proof container (with some headspace) makes a nice “ice pack” in your lunch kit, and it will thaw by lunchtime. If you work at home, this can be frozen in single-serving containers and set on the counter for lunch that day. Warming in a saucepan is my favorite, but of course the microwave is fine too.

Saturday, August 17, 2024

Chicken Noodle Soup

Chicken noodle soup is conic for a reason.

When autumn calls, there is nothing like a pot of hearty chicken noodle soup, and a bowl of this seems to be able to banish colds as they start. I especially like to serve some up during the first week of school as a tonic to all the new-people germs, even though school starts before Labor Day more often than not these days.

I’ve included some notes at the bottom for make-ahead options for the ingredients, which cuts the overall cooking time down considerably.

Ingredients 
Base
1 c. chopped celery
1 c diced onion (about one medium or half a large)
2-3 cloves garlic, minced
Salt and freshly ground pepper
2 tablespoons oregano
1/2 cup red lentils

Soup
4 c broth plus 2 c water (broth can be made with bullion, or you can just use water for the whole thing)
2-3 carrots, diced
2-3 new potatoes, chopped
Cooked chicken, cubed or shredded (can be simmered covered in water for an hour in advance and then drained and stored in the fridge)
1 c or so hearty egg noodles
Chopped parsley, optional

Directions
  1. If you haven’t cooked the chicken yet, set it in a pan so that the breasts are single layer and covered in water. Bring to a simmer slowly and cook for about an hour.
  2. Coat the bottom of your soup pan with olive oil and set the pan over medium heat. Add the base ingredients to the oil and cover. Let cook until the onions are transparent, stirring occasionally, about 20 minutes. 
  3. While the base is simmering, chop the carrots and potatoes. Add to the pan and adjust the seasoning as desired. Pour in 4 c broth (or water) and stir to combine. Let simmer to combine the flavors, at least 20 minutes. It’s fine to let this simmer until the chicken breasts are done cooking.
  4. Chop the cooked chicken into cubes (or shred it) and add to the pot, stirring to combine. Add the remaining water and bring to a low boil. 
  5. Add the noodles and stir. Let boil for about ten minutes to cook the noodles, then reduce heat (or turn the heat off). 
  6. Stir in the parsley, if you haven’t already. Let stand a bit to marry.
  7. Serve with fresh crusty bread and a glass of milk.

Equipment
I make this in a 4.5 quart enameled cast iron soup pan, but any heavy stock pot or Dutch oven will do.
Wooden Spoon
Good chef’s knife for chopping

Saturday, August 3, 2024

Simple Beef Stew

This small-batch stew recipe makes the most of a few ingredients, and comes together quickly. It’s written for four servings, but it can easily be doubled or even tripled (just remember to size up your Dutch oven accordingly). Leftovers marry up nicely in fridge overnight, and this can be made ahead to have on hand for a simple and satisfying meal. Serve with crusty bread and fresh milk.

Ingredients
1 pound stew meat (or a roast cut in cubes), or coarsely ground beef
6 oz can tomato paste
3 cups beef broth (from bullion or what have you)
2 medium potatoes, any variety, cubed
2 carrots, cut into inch-sized pieces
1 cup diced cabbage (I like red, but any will do)
1/2 onion, diced
2 stalks celery, diced
2 cloves fresh garlic, diced
A few sprig fresh thyme
Salt & pepper

Directions
Coat the bottom of a 4 quart Dutch oven with olive oil and warm over medium heat. Add the beef, onion, and garlic and simmer covered until onions are translucent. Add everything else and stir to combine. Lower heat and cover. Simmer for 60-90 minutes, checking as needed to stir and prevent sticking. Add salt and pepper to taste. 

Saturday, June 1, 2024

Simple Classic Chicken salad

Nothing says summer quite so much as a heaping scoop of fresh chicken salad on a bed of lettuce or fresh spinach. Packed with whatever goodness you want to include and plenty of protein, this is sure to delight even on the hottest of days. It’s all the better for chilling overnight, so please do yourself a favor and make it in advance. It’s a brilliant dish to help keep things simple when the mercury rises.

Paleo, Whole30, and primal diets are supported by choosing an avocado mayonnaise and trading the mustard for a dash of red or white wine vinegar or lemon juice.

Ingredients
3 pounds boneless skinless chicken breast
4 cups chicken broth, plus water as needed
1 cup chopped celery
1 cup or more chopped scallions, green parts and white parts
1/4 c finely diced red onion
1 cup shredded carrots
1.5 cups mayonnaise
1 Tablespoon Dijon mustard
A few sprigs fresh tarragon, optional, but you'll be glad you added them
Freshly cracked black pepper. 

Directions
Set the chicken breasts in a pan so that they are single layer and don’t touch.
Cover with the chicken broth. Add water if necessary to bring the water above the chicken.
Cover the pan and set on medium high. You want the chicken to come to a simmer slowly. Once it simmers, turn the heat down just a smidge and continue to simmer for at least an hour, until the chicken is cooked all the way through.
Lift the chicken out and let set into a large mixing bowl to cool. (If you need to delay, just move the pan off the burner and let the breasts cool in the liquid.)
Shred the cooled chicken using two forks.
Add the chopped vegetables and tarragon.
Mix the mayonnaise and mustard together in a small bowl. Stir in the pepper.
Fold the mayo mix into the chicken and vegetables. Stir until coated and evenly distributed.
Cover the mixing bowl with a lid or beeswax cloth or Saran Wrap.
Set in the refrigerator for at least an hour to chill.

Variations
You can do so many different things to make this to your liking.
Avocados help reduce the mayonnaise needed and really bump up the healthy fats and nutrients while keeping everything rich tasting. It’s also a perfect way to use those avocados that have to be eaten right now. 
Grapes! Apples! Dried Cranberries! Whatever fruit your heart is craving or that you have on hand will blend in nicely and give the salad an air of sophistication.
Nuts. Traditionally, pecans are used, but you could use chopped almonds (my favorite) or walnuts. Pine nuts are exceedingly good in this.
Fresh herbs, especially parsley. Chopped parsley is a nice balancer. Lemon juice and basil combine well, too.I’d avoid anything overly aromatic and savory (such as oregano or sage), but thyme or chives are a nice addition.
Other Vegetables. Whatever is in season and on hand can be chopped and added. Sugar snap peas or snow peas are a lovely addition and have plenty of great nutrition. If you want cucumber, be mindful of how watery it can get.

Thursday, January 25, 2024

Rainy Day Crockpot Chili

This is a work-in-progress, one-pot recipe that is perfect for simmering while you do anything else. The result is hearty and warming and can be served as is, heaped in a bowl with some shredded white cheddar on top or not, but definitely with some rustic bread. This is perfect for the day-old leftovers of The No-Touch, Quasi-Sourdough Recipe and a glass of farm-fresh milk.

This recipe is small-batch, written for a 2.5 quart crockpot, but it could easily double.

Ingradients

1 pound lean-ish ground beef (raw, but not frozen)
1-2 jalapeno or chili peppers
Chili powder
Cumin
Red pepper flakes (optional)
1/2 onion (or the whole thing, depending on your preference)
1 28 oz can tomatoes, whole or diced
1 15 ounce can dark red kidney beans
Olive oil

Method

Coat the bottom of a 2.5 quart crock pot with olive oil and set on high.
Chop the jalapeno peppers and onion and add to the oil, stirring to coat.
Add cumin and red pepper flakes and stir, then cover and cook for about an hour.
Add the ground beef, using a wooden spoon or the like to break into small chunks.
Stir to mix and cover. Let cook for at least two hours.
Add the kidney beans, tomatoes, and chili powder.
Stir to blend and cover. Let cook for at least two hours. If you need to leave it more than six hours, I'd recommend turning the heat down to low.

Stores well, if there are any leftovers.

Monday, January 1, 2024

Quinoa


Quinoa uses the same water ratio as rice (1:2), cooks in 15 minutes (1/2-1/3 time), and yields 4 cups cooked per dry cup of 'grain' (it's actually a seed). 2 cups per pound dry, same as rice, but double the volume for less energy. 

Yield: .5 ton/acre, or enough to give 20 people one pound a week for a year, just over a cup cooked every day.

Plant in April, drought resistant, needs little in the way of irrigation. Good drainage is needed to prevent waterlogging. A fall crop can be planted in warmer climates.

Harvest in 90-125 days, in June for early maturing varieties, which leaves the soil available for warm weather planting such as sweet potatoes.

Use as a replacement for rice.
Also makes an excellent Tabouli.

Wednesday, June 7, 2023

Frittata

Summer is a time when the hens and gardens start producing in what seems to be a competition to see who can bury the farmer in the most produce. I love it. 
Nothing sets the table and the tone of summer like an easy dinner frittata, whipped up with the goodness of fresh-from-the-garden vegetables and herbs. Cheese is optional, and if you want to avoid dairy, it's fine to use your favorite nut or vegetable milk here. I particularly like to make this in the oven after I've taken out a loaf of bread, letting the bread cool while the frittata cooks, and making use of the already-hot oven. Or, if I already have bread to serve with the meal, I make it while the bread pan is heating. It's a great recipe and works well with nearly any schedule.

How To Make A Frittata

  1. Start by whisking together the frittata base: a simple mixture of eggs, milk, garlic, salt, and pepper.
  2. Then, sauté your veggies in a 10 or 12-inch (cast iron) skillet just until tender.
  3. When the veggies are ready, stir in any spices or herbs before adding the eggs. Pour in the frittata base, and shake the pan gently to distribute it among the vegetables.
  4. Sprinkle your frittata with cheese (if using) and transfer the pan to a 400-degree oven.
  5. Bake for 15 to 20 minutes, or until the eggs are set and the top is lightly golden around the edges.
  6. Allow the frittata to cool slightly before slicing and devouring!

Frittata Tips

  • Spread your veggies evenly throughout the pan before pouring in the eggs. Once you pour the egg mixture in, you won’t be moving the vegetables around much (or you’d end up with scrambled eggs!), so make sure the veggies are spaced evenly in the pan to get a final frittata with veggies in every bite.
  • Change it up! Play around with  flavor combinations. If you try swapping in different herbs or vegetables, keep in mind that a good veggie:egg ratio is about 1/4 cup of veggies per egg, or 2 heaping cups of vegetables for 6-8 eggs.
  • Use a cast-iron skillet. The best choice for making frittatas, cast iron skillets can safely go from stovetop to oven, and they conduct heat well and evenly. Seasoning a cast-iron pan gives it a non-stick quality, so a well-seasoned skillet will result in the easiest slicing & serving. I like to use an enameled cast iron skillet, which does not require any pre-seasoning. If you don’t have a skillet, go make this breakfast casserole recipe instead.
  • Safety first! Don’t forget that when the cast iron skillet comes out of the oven, the handle will remain hot for a while – I’ve learned this the hard way multiple times. Place a kitchen towel on it to remind yourself not to grab it before it cools off. You can also get one of these silicone handle covers.

Equipment

  • 10-Inch Skillet (I like to use an enameled cast iron skillet, but any heavy skillet will do)

Basic Frittata Recipe:

  • 6 large eggs (use 8 eggs for a 12-inch skillet)
  • ¼ cup milk
  • 2 garlic cloves, minced
  • ¼ teaspoon sea salt, more for sprinkling
  • Freshly ground black pepper
  • Extra-virgin olive oil, for drizzling
  • 2 cups chopped fresh vegetables
  • Chopped fresh herbs (basil is particularly nice with tomatoes, while tarragon is great with mushrooms)
  • ¼ cup or more cheese of your choice 


Friday, May 19, 2023

The No-Touch, Quasi-Sourdough Recipe

 The No-Touch, Quasi-Sourdough Recipe

Real bakers will tell you that you have to weigh everything, and that volume measurement is insufficient. They know what they speak of, but I’m using volume measurements anyway. If you are lucky enough to have a kitchen scale, I have the weights noted as well. Bread is forgiving and it loves you. All will be well.


Some of the nutritional benefits of this bread: it has no sugar, added fats, or preservatives. Also, by having a nice long rising time, it is a fermented bread, which means that lots of people who are gluten sensitive can eat it.


Equipment

A large bowl — think “the popcorn bowl,” big enough to hold a whole bag of microwave popcorn. Mine is about 4 quarts, and I wouldn’t go much smaller.

A whisk. Any kind will do. I use a straight ball whisk, but that’s because I already have it. You could use a fork and it will be fine.

A wooden spoon, any variety.

A cast iron pot/pan with a lid, not overly large. This is where things get specific and tricky. I use a loaf nest, and have great results. It’s pricey, and heavy as well. I hear that you can use a basic cast iron Dutch oven of any sort, but I’ve not been able to get decent results in the oven (I got great results when using this method in the wild, on actual coals and with a fire pit, but not the oven.) Le Cruset and other name brands have similar enameled cast iron bread cloches, and they are (somehow) even more expensive. If you find that there’s a cheaper, less equipment-specific solution, please let me know. 

A silicone or parchment paper liner to help make lifting the finished loaf easier.

A lid large enough to cover the bowl, or plastic wrap


Ingredients

1/4 teaspoon yeast (.5 g)— really it’s just enough grains to get it going.

1.5 teaspoons salt ( 8-10 g) — I use about 10g, and I like Himalayan (pink) mineral salt, as it seems to give the dough a deeper flavor character. I have thoughts on many different kind of salt (grey, black, Celtic, etc), but go with what you have. Try to avoid iodized salt, as it can change the whole reactivity that we’re after.

1.75 cups (14 ounces) of water (400g) —if you have access to filtered water, this is ideal. If not, you can let the water sit on the counter for a day or so to let the chlorine evaporate.

4 c. Flour (500 g) — you’re going to want to avoid most “all purpose” flours because they don’t have enough protein to make the reaction happen. For store bought, I like King Arthur Unbleached all purpose. You’ll know it’s the right one because it has a little “11%” badge on it, indicating that it has 11% protein. This is the right one. 


Method

  1. Mix the yeast, salt and water together in a large bowl with a whisk until blended. This might take a couple applications. The yeast can be reluctant to dissolve, but once it does the liquid will become cloudy and the salt will get in on the action too.
  2. Add about half the flour and blend with the whisk until everything is damp. There will probably be bubbles happening in the flour as it hits the yeast. This is all wonderful.
  3. Add the remaining flour and mix with the wooden spoon (or you can use the whisk still if you prefer — I find it gets a little clumpy on the whisk as it starts to become dough). Don’t drive yourself crazy here — this is just to make sure all the flour is incorporated into the moisture. It will be a soft dough, a little stiffer than a batter.
  4. Once everything is combined, cover the bowl with a large lid or plastic wrap. The goal is to keep it warm and prevent it from drying out.
    The whole process up to this point should only take a few minutes. If you’re having misgivings, call me and we’ll video chat while you do these steps, and I can reassure you that all is great.
  5. Place it in a nice cozy spot for 12-18 hours. It should double in volume and have a tangy aroma.
  6. Preheat the oven to 450F (230 C). Place the bread pan and its lid (the cloche) inside (without the silicone liner, if you’re using one) to warm for 45 minutes.
  7. The pan will be scary hot at this point. Take the cloche out of the oven and insert the silicone liner in the lower portion. Scrape the dough into the lower half of the cloche — I use the wooden spoon to sort of coax the dough out, and it usually rolls right into the pan.
  8. Put the lid on the cloche and transfer the pan back into the hot oven. 
  9. Bake for 45-60 minutes. I usually end up setting the timer for 50 minutes. 
  10. Take the lid off and let it bake another 10 minutes if you like a crunchy crust (which I do). It also makes the whole thing less weighty when removing it from the oven.
  11. Remove the cloche from the oven and lift the loaf out of the pan (still using a hot mitt — the liner is hot too!) and gently peel the liner away from the loaf.
  12. Let it cool.
    This is easily the hardest part of the whole process! But it’s important. If you cut it before it cools, the whole thing will get sticky and collapse into something somewhat less than bread. Cooling is actually part of the baking process.
    Feel free to take pictures and send to your friends. Invite them over, even. Or keep the whole thing to yourself.  Also of note is that this bread makes  delicious croutons — the texture is just lovely for it. Cut the day-old bread into cubes, toss with olive oil (and any herbs you’re into at the moment) and broil on a sheet pan for a few minutes, stir, and broil again, repeating until they are as crisp as you prefer.

Storing Vegetables without Plastic